Learn · Schedule grid and Gantt
Set up your grouping structure, then start building
After this subject you can lay out the dimensions a project is organised on, see them on screen before a single activity exists, prune the bands you do not want, and build into what is left.
One set of activities, many ways to read them
A schedule in Brikt is one flat set of activities. The structure — area, trade, phase, who is responsible — is a lens you put over it, not a folder tree you commit to on day one. Each of those is a dimension, and the buckets inside it are its values.
Why it matters — in a schedule built out of folders, the breakdown you pick in week one is the one you argue with in month six.
Make the structure before the work
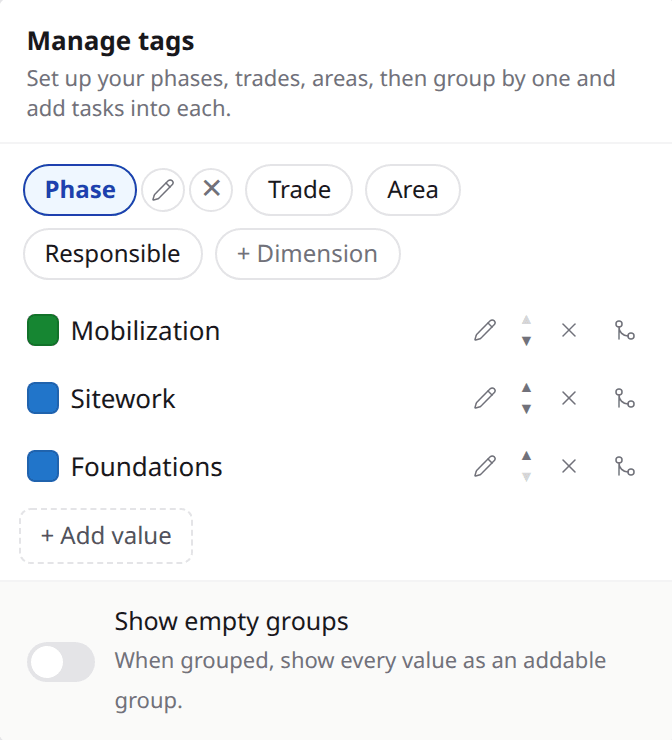
Open Manage tags and create the dimension first — Area, Trade, Phase — then add its values. The panel says what it is for: set up your phases, trades and areas, then group by one and add tasks into each. Creating them is a writer's job, so it takes project admin or editor.
Look at
- 1The dimensions across the top — the axes, not the buckets.
- 2The values inside the selected one, and Add value below them.
- 3The Show empty groups switch, which draws a band for a value nothing carries yet.
Why it matters — this is the step a reader arriving from a work breakdown structure expects to be a folder tree, and it is not one.
Group by one, and the grid regroups around it
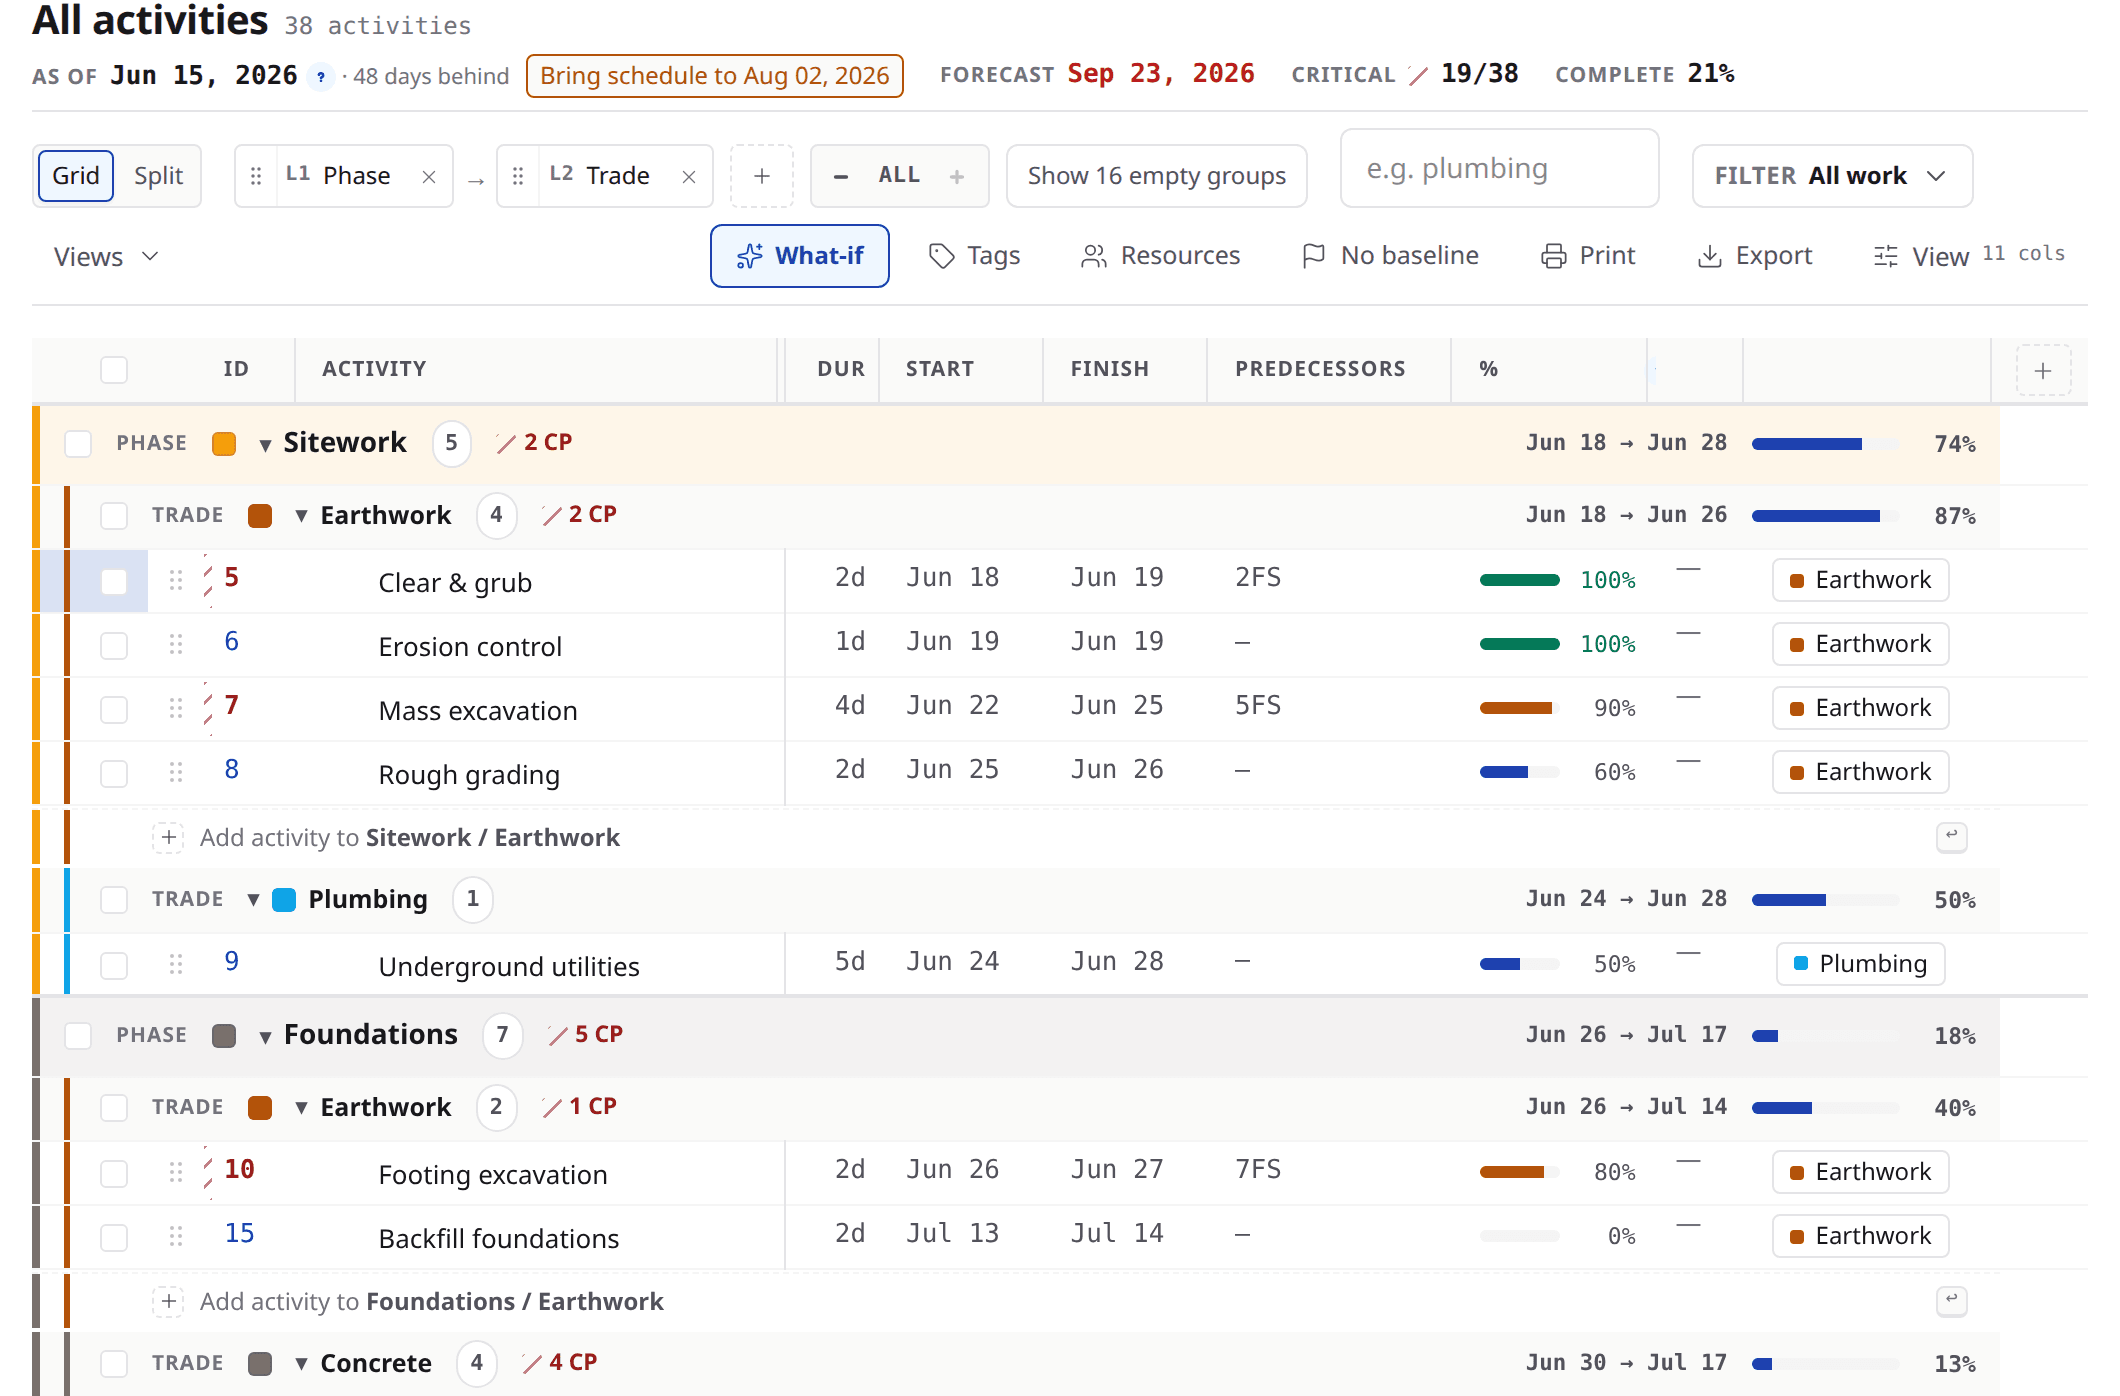
Pick a dimension to group by and the rows sort into bands under it. Add a second level and those bands divide again inside the first; the levels are reorderable, so the same activities answer a different question without a single date moving. Nothing is copied and nothing is filed twice.
Look at
- 1The two chips, L1 then L2, in the order they apply.
- 2The dashed control beside them, which adds a third.
- 3A trade band sitting inside a phase band, each with its own count.
Structure you can see before a single row exists
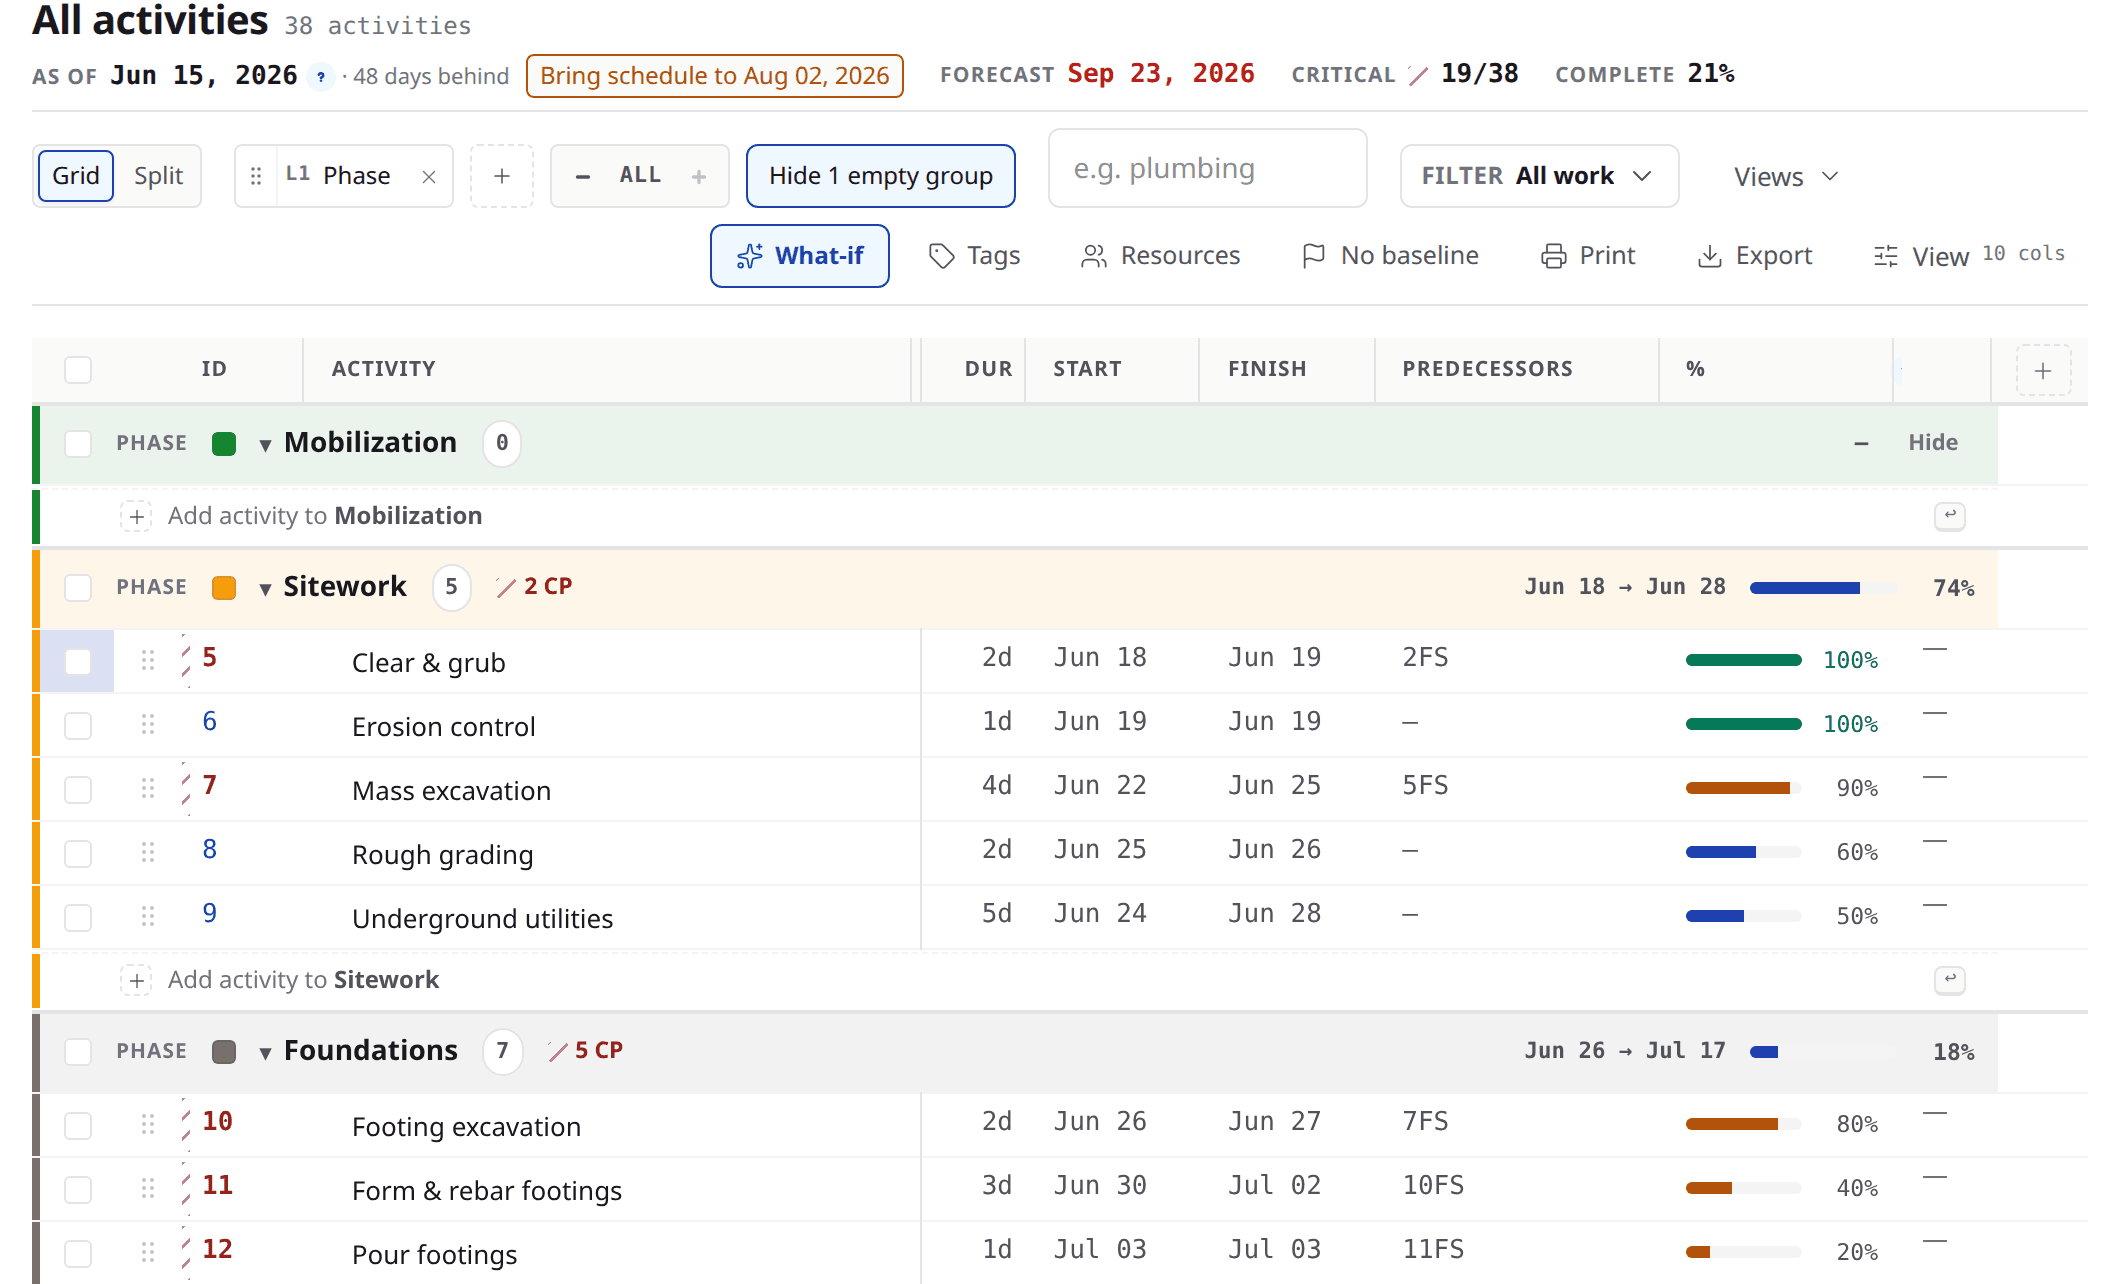
A group with nothing in it usually has nothing to show. Turn on Show empty groups and the grid draws a band for every value in the catalog instead, so a structure you created five minutes ago is on screen, empty and waiting. The switch says it plainly: show every value as an addable group.
Look at
- 1A band with a count of zero — a value nothing carries yet.
- 2The row at its end, ready to add the first activity into it.
- 3The toolbar control, now offering to hide them again.
Why it matters — this is the answer to a value that seems to vanish the moment you create it. The switch sits in Manage tags beside the values, so it is a writer's control like they are, and the toolbar chip states how many empty groups it is adding, or hides them again.
Hide the bands you do not want
Not every value belongs in every read. Each empty band carries a Hide button, and hiding one is explicit and reversible — a restore link brings them all back at once. It is scoped to the band you hid, so hiding Level 3 under one building leaves Level 3 standing under the next.
Why it matters — nothing is deleted. A hidden band comes back on its own the moment an activity lands in it.
What a saved view keeps, and what it does not
Show empty groups and the bands you hid belong to this session. They are deliberately not saved into a view, because the switch that creates those bands is itself temporary and a reload should start you clean. What a saved view keeps is the lens: the grouping levels, the columns, the filters.
Then build into it
With the structure on screen you build into it. Every band ends with a row reading add activity to that band, and an activity created there is tagged for you — every level of the band it was added to. An activity already in the schedule moves by changing its tag, which is one cell.
Ask what the job is organised by
Ask
What are we going to read this job by — area, trade, phase?
Instead of
What should the work breakdown structure look like?
Ask
Which areas have no work planned in them yet?
Instead of
Is the schedule complete?
Ask
Show me the same schedule by trade.
Instead of
Can you send a version grouped differently?
What to remember
- The activities are one flat set; area, trade and phase are lenses over them.
- A dimension is the axis and its values are the buckets. Create both before the work.
- Show empty groups puts the whole structure on screen before a single activity carries it.
- Hiding a band is explicit, reversible, scoped to that band, and undone the moment work lands in it.
- Build into a band from the row at its end, or move a row by changing its tag.
Lay out one dimension before you add a row
On the next project you start, open Manage tags and create the one dimension you will actually read the job by. Add its values, group by it, turn on Show empty groups, and look at the shape before any work exists. If you would rather do that on a real job with somebody alongside you, bring one to a demo.